Data Leak Prevention (Azure Rights Management): aOS Kuala Lumpur 2018

Good day, everyone, I’m not here to insult but to raise awareness, so please read this with an open mind.

I had met and chat with a few different people from different companies, asking them to do you know about data security, is your company ready for data security, what do you think about security, and etc..

Most had replied to me that data security is expensive and does impact the end users productivity. When they told me that it is expensive, and I had asked them “why do you think it is expensive? “. Their answers had hesitation in it. Anyway, to the ones that told me that security could only bring impact to users, and I replied them “Plan, organize, and proper implementation, never jump/rush to a conclusion” (Disaster plan is important).

Technology is there, is how you look at it and use it. (A joke: Don’t tell me that you go shopping and you just blindly buy stuff without testing or checking whether that it really suits your needs/wants.)

Yes, whenever most users or companies hear about security, the first thing on their mind was expensive and impact. Had you really asked and research and gather enough information to prove it? (You know references) Had you ever compare the investment of data security vs The cost of Fines from regulators? (GDPR law fines? PDPA fines?)

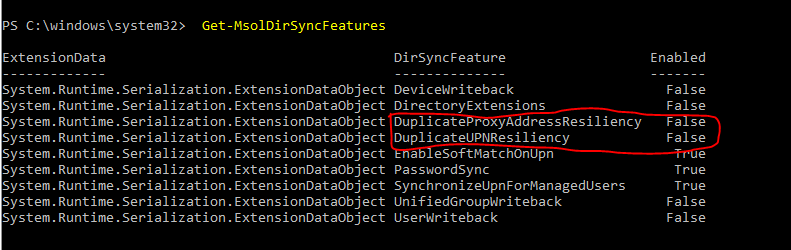
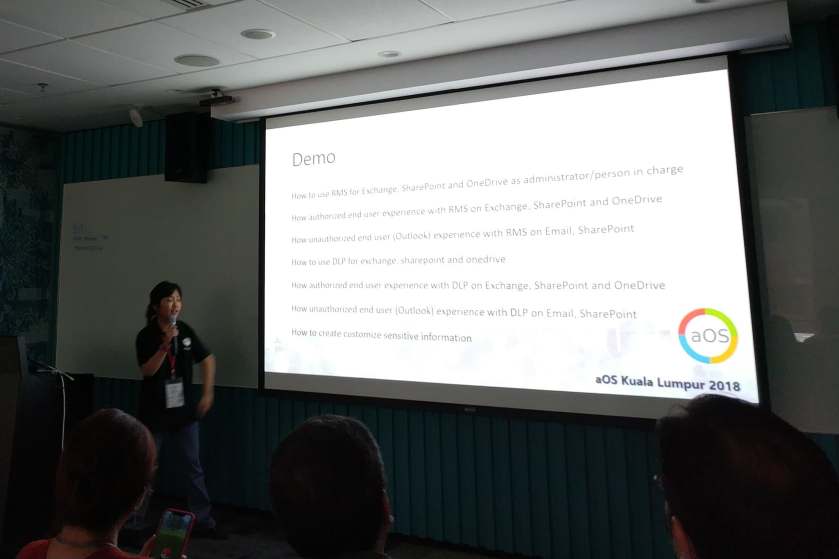
During my talk about Data Leak Prevention (Rights Management) in aOS KL event, on 23rd October 2018. I was trying to gain awareness to the audience about data security too. However, there was one audience told me that Microsoft enterprise license is expensive.

What I replied to the person, who was asking about the pricing of Microsoft enterprise license was to ask for more information with the licensing companies. I should have added another replied “Are you ready to lose 2% to 10% of your company global revenue (or probably both fine and jailed) to regulators?” but my session period had used up another extra 5 mins (felt panic and guilty to used up the time that is not mine already).

So for the people that were asking/telling about the security license is expensive in a technical session, I kindly advise you to think twice or many times to the statement above, which I’ve highlighted in RED.

Quote;
“Better safe than Sorry”
“Never a technology problem, Is human/attitude problem”
“Never try, never know”
“Plan, Don’t make harsh decision/actions”
“Live till old, learn till old” (Take Malaysia’s latest Prime Minister as an Example)
“Ask more doesn’t do harm, Only Stupidity does harm”
“Stop dreaming, Wake up is reality”

44713511_254650268584098_815480119027040256_n
Speaker for aOS Kuala Lumpur 2018 (IT Pro), Office 365 Security Compliance and Azure Information Protection Demonstration
44703405_2249593058655998_7974614577625169920_n
With Patrick Guimonet

44857196_325676234652877_3635763410328616960_n
Data Breaches since 2000s till 2018


Reference:

https://sway.office.com/eQ1CbkS7mOE5dvSi

Office 365: How to handle resign user mailbox with litigation hold enabled?

Litigation hold is a feature that allows you to keep your mailbox with specific period or unlimited period. However, this is only the high level definition of litigation hold. Through out my deep and many research of Microsoft articles, especially technet it only state high level of definition of litigation hold but nothing about notices.

Few weeks ago I’ve encounter one of my user reported to me, saying that they have a user account that is disable (in Active Directory)blocked sign in and unlicensed but the mailbox still in active state and able to send (etc inbox forwarding rules) and receive mails and also able to login if with full access. After few research, I found a Microsoft article (support article “https://support.office.com/en-us/article/manage-inactive-mailboxes-in-office-365-296a02bd-ebde-4022-900e-547acf38ddd7“) , about how to handle inactive mailboxes. However, it still didn’t state why it happens or how this mechanism works.

We call this as deprecated account but active mailbox. I really hope that Microsoft could do something about this as it seems to me it is pretty troublesome to go extra further step to handle this, and also hope that they could elaborate more about litigation hold pro and cons or how this mechanism works.

*Note:

Please take note if you have mailboxes with unlimited litigation hold enabled, and user account in Active Directory is disable but in a sync Organization Unit, please move them to a unsync organization unit IMMEDIATELY or else it will full up the mailbox storage. 

To check whether which Organization unit is unsync;

  1. Just go to your Azure Active Directory Server
  2. Windows Start button
  3. open MIISCLIENT or Synchronize Services
  4. On top select “Connection”
  5. double on your local domain
  6. select Configure Directory Partition
  7. at the bottom right button
  8. select “Containers”
  9. enter Azure Active Directory credential
  10. you will able to view unchecked boxes means they are the unsync organization unit.


References:

  1. https://support.office.com/en-us/article/manage-inactive-mailboxes-in-office-365-296a02bd-ebde-4022-900e-547acf38ddd7
  2. https://technet.microsoft.com/en-us/library/ff637980(v=exchg.160).aspx#lithold
  3. https://technet.microsoft.com/library/dn743673(v=exchg.150).aspx
  4. https://technet.microsoft.com/en-us/library/dn790612.aspx


SharePoint Online and Office 365 groups: What is the difference between soft delete and hard delete?

Yes, SharePoint Online and Office 365 groups (aka Unified Group) are concurrent. Example, if you have create a Microsoft Teams Group/Team or create an Office 365 groups or create a Team sites, Microsoft Office 365 will create a site or create a group for it too. However, now Microsoft Office 365 has a new category of create site, called Communication site. (FYI, I am still learning on it).
Anyway, I am here to provide a notice or knowledge to technical and end users, when comes to creating and editing/modification sites, everyone are very good at it. However, when it comes to deletion, no one really cares !
Now here comes the interesting part, try asking yourself “What actually happens, when i deleted a group?” and your possible answer is “Oh, it just went into my recycle bin.”. I couldn’t agree more to that answer but that is only partial information that you know about the deletion function.

○ Definition of soft deletion – “Recycle bin with retention period of 30 days”
○ Definition of hard deletion – “After retention period of 30 days and 93 days, Microsoft Online Service Garbage Collector (You will notice this from your Audit log in Security and Compliance), will automatically permanently force delete anything inside the recycle bin”
*Note:
○ This may takes up to 24 hours or 48 hours for permanent deletion completion

Anyway, administrator and users don’t have to be afraid of 30 days retention, where now Microsoft has extended the retention to 93 days, where all things in recycle bin will be move to a secondary recycle bin. However, there is always a limited quota for secondary recycle bin, if exceeds than it will automatically purges the oldest items. (Please refer to the references)
References;

Office 365 & Outlook: Policy tip of “this sender fail fraud detection (spoof)”

The only reason of warning you see “sender fail fraud detection” in your outlook while sending or replying a mail to another domain, could be that the other domain doesn’t have the valid/existence of a “include” record or etc. in their SPF record. Thus, authentication fail.

To resolve this is to add the missing particular record to your SPF record;

Example:

Actual;

v=spf1 ip4:192.168.1.1 ipv4:192.168.1.2 mx ~all


Expected;

v=spf1 include:spf.protection.outlook.com ip4:192.168.1.1 ipv4:192.168.1.2 mx ~all

*Note: This will take up to 24 hours for the record fully propagated. There is not much differences for your “all”  with symbol of “~”, “-“, or “?”. After propagated, make use of this online DNS checking tool called “mxtoolbox” to make sure the record is correct.

If after adding/modifying your SPF record, and you still having trouble with it, is best that you check with your hosting company and raise a case to Microsoft Office 365 support  for further assistance. 

Office 365 & AD & Exchange Hybrid: How to create remote mailbox in Exchange Hybrid for existing user, in Active Directory and Office 365?

When you have existing user active directory record and you’ve accidentally had provision the mailbox at Office 365. Thus, result you unable to add the user into any distribution group and etc. because it doesn’t have record in Exchange Hybrid. Besides, user’s primary email address wasn’t correct, such as “xxxx@domain.onmicrosoft.com” instead of “xxxx@domain.com”.

Here are the steps to resolve your problems;

Implication: None (for me)

*Note: You have to be familiar with PowerShell. Best to try it on a test user account first.

  1. Go to Exchange Hybrid server
  2. Open Exchange Powershell Management
  3. Type the following commands;

    Enable-remotemailbox “userDisplayName” -RemoteRoutingAddress “xxxx@domain.mail.onmicrosoft.com”

  4. Go to Azure AD Server
  5. Open Windows Powershell

    Start-ADSyncSyncCycle -PolicyType Delta

  6. You will than review that particular user’s the mailbox in Office 365, has more email addresses shown in the email address category itself. And also the Primary email address has change to the right one.


*Note: This may take half an hour for the overall settings to be propagated at the user side. Because at the user side they will still view their primary smtp as the incorrect one, even though the modification has done.

Office 365 & Exchange Online: Why have to be careful with Mail Flow Rules?

Many thought that even they are from programmer background or any Technical background could achieve to implement 101% accurately correct mail flow rules, based on a programmer mindset. However, by having such thoughts will bring risks to yourself and the company itself.

*Note: If you’re not familiar of the product, then please try not to play around with it in production environment. Always, start off with research and lab testing.

Mail flow rules brings huge impact to your organization’s mail flow with slight incorrect configuration of a rule. Example, mails send to only Department B, aren’t suppose for Department A to be view but then Department A somehow able to view mails that is for Department B. However, this causes data leak within organization.


Is best to spend time to understand the product than rather getting yourself in trouble.


Reference

  1. https://technet.microsoft.com/en-us/library/jj919235(v=exchg.150).aspx


Office 365 Custom DLP: How to create custom Sensitive Information?

Yes this is interesting topic for me because it involve programming! I will make this topic as simple as learning alphabet, because I will be showing you the importance on how to create your very own DLP sensitive information. DLP templates are come in the form of xml file format.

*Note: You may need to spend some time in this. Practice makes perfect result.

Importance that you must include into your xml are:

  1. Rule
  2. Entity
  3. Pattern
  4. Identity Match/Id Match/Format/RegularExpression

#This is the flow chart

Rule -> Entity -> Pattern -> Identity Match/Format/Regular Expression

Ok, now you know what are the importance, next will be things you need to take note on the “importance” that can have multiple section. That is “Pattern” & “Identity Match”. You can only have 1 rule consist with 1 Entity, where that Entity can have multiple unique pattern types and each pattern can have its own unique ID Match.


Below is a sample of my code on how it looks like in xml;

*Note: You have to change the GUID of the highlighted red parts, as you can see there are 4 GUIDs, but only 2 GUID are the same. To get new GUID, you simple have to open your PowerShell and type the command “[guid]::newguid()”.

<?xml version="1.0" encoding="UTF-8"?>
<RulePackage xmlns="http://schemas.microsoft.com/office/2011/mce">
<!-- Need to change guid, rule package guid, [guid]::newguid()-->
<RulePack id="872155dc-1234-4e3e-a10d-x"> 
<Version build="0" major="1" minor="0" revision="0"/> 
<!-- Need to change guid, publisher guid --> 
<Publisher id="6907d14a-1234-4023-87cd-x"/> 
<Details defaultLangCode="en-us"> <LocalizedDetails langcode="en-us"> <PublisherName>Company Group</PublisherName> 
<Name>ID Custom Rule Pack</Name>
<Description> This rule package contains the custom ID entity. </Description> </LocalizedDetails> 
</Details>
</RulePack>

<!--This orange part, is your rule type-->
<Rules>
<!-- ID --> 
<!--This blue part, is your entity-->
<!-- need to change guid, entity guid--> 
<Entity id="b660289d-189e-1234-9e0a-x" patternsProximity="300" recommendedConfidence="70">
<!--This green part, is your pattern type-->
<Pattern confidenceLevel="80"> 
<!--This purple part, is your Identity match name-->
<IdMatch idRef="Regex_id1"/> 
</Pattern>
<Pattern confidenceLevel="80">
<IdMatch idRef="Regex_id2"/> 
</Pattern> 
</Entity>

<!--This pink part is your Regular Expression-->
<!--Format: AB-C-DE-FGH--> 
<Regex id="Regex_id1">(\d{2})[-](\d{1})[-](\d{2})[-](\d{3})</Regex> 
<!--Format: ABCDEFGMANNN -->
<Regex id="Regex_id2">(\d{7})[mM][a-zA-Z](\d{3})</Regex> 

<LocalizedStrings> 
<!-- Resource guid same as rule guid --> 
<Resource idRef="b660289d-189e-1234-9e0a-x">
<Name default="true" langcode="en-us">ID</Name>
<Description default="true" langcode="en-us"> A custom classification for detecting IDs. </Description> 
</Resource> 
</LocalizedStrings>

</Rules>

</RulePackage>

The above xml consist of 2 patterns both are set with accuracy of 80%, means if DLP scanned your mail/sharepoint/onedrive consist what is inside the pattern and has 80% match percentage will trigger the rule. Inside each pattern consist unique identity which name “Regex_id1”  and “Regex_id2”. After that, is comes to setting the format for each unique identities. As you can see above, the format i had state in the comment.

*Note: The code above doesn’t limit your needs, you could play around with what you wish to include, such as keywords, false positive, or etc.. You could learn more about twerking around the codes by reading below references. You can also use any online tester site to test out regex of your code .


References:

  1. https://support.office.com/en-us/article/Create-a-custom-sensitive-information-type-82c382a5-b6db-44fd-995d-b333b3c7fc30
  2. https://docs.microsoft.com/en-us/dotnet/standard/base-types/regular-expression-language-quick-reference
  3. https://justaucguy.wordpress.com/2014/11/21/adventures-in-custom-dlp-rules-part-one/

Office 365: Email address with random numbers attached UPN (user123@contoso.onmicrosoft.com)

Why do some of my users have random numbers attach with their UPN? Well the only answer to this question is, duplication occur because you haven’t force delete the old account from Office 365 recycle bin. And by default there is a setting in Azure AD to detect duplication is set to false, so this is another reason that even there are duplication in AD created and a sync has been trigger the duplication will also be sync to the Office 365.

To prevent any duplication in future to be sync to the Office 365, is to set the duplication checking in Azure AD to true. So that any duplication is scan will be rejected to be sync to the Office 365. To resolve the duplication currently having is to delete the account and resync it to Office 365.

*Note: These random numbers in your smtp has no implication or effects to your mailbox/account, but it is only not nice to see it that way. It is up to your choice to do it or not.

*Azure Module Power Shell needed

  1. Open Azure power shell
  2. Type the following command to get the sync feature

Connect-MsolService

Get-MsolDirSyncFeatures

dirsyncfeature

3. Next, enable both of the feature to true

Set-MsolDirSyncFeatures -Feature DuplicateUPNResiliency -Enabled $true

Set-MsolDirSyncFeatures – Feature DuplicateProxyAddressResiliency -Enabled $true


*Note:

Situation 1: If the mailbox is still new, you will only need to delete the account and force delete from the recycle bin, then do a resync 

Situation 2: If user have the mailbox for very long, you have to break the dirsync wait for the account’s status change from “Sync from on premise” to “on cloud“, then from Office 365 you can edit its smtp address but make sure you have your recycle bin clear from the old account. (Yes this is much troublesome than Situation 1)


Step by step for situation 1

  1. Locate the account from Office 356
  2. Unassign the mailbox license
  3. At Active Directory, move the account to a unsync organization unit
  4. At Azure AD Connect, run a manual sync command

Start-ADSyncSyncCycle -PolicyType Delta

5. Make sure the account at Office 365 has gone to the “Deleted User” Category

6. Once the account has been appear in “Deleted User” Office 365, you have to run a command to force deleted from the recycle bin.

7. Open Azure Module PowerShell

8. Type the following command, enter the UPN that you wish to remove from recycle bin

Connect-MsolService

Get-MsolUser -ReturnDeletedUser

Get-MsolUser -ReturnDeletedUser | Remove-MsolUser -UserPrincipalName xxxx@domain.com -RemoveFromRecycleBin -Force

9. After finish remove the account from recycle bin, move back the account from unsync Organization Unit to Sync Organization Unit

10. At Azure AD Connect, run the manual sync command

11. At Office 365, locate the account and assign license

12. You can notice there is no more random numbers found


Step by Step for Situation 2

*Make sure recycle bin is clear from duplication accounts

  1. Open Azure Module PowerShell
  2. Type the following command, enter the UPN that you wish to remove from recycle bin

    Connect-MsolService

    Get-MsolUser -ReturnDeletedUser

    Get-MsolUser -ReturnDeletedUser | Remove-MsolUser -UserPrincipalName xxxx@domain.com -RemoveFromRecycleBin -Force

  3. Open Azure Module Powershell
  4. Type the following command

Connect-MsolService

Set-MsolDirSyncEnabled -EnableDirSync $false

3. You probably have to wait for 24hr to 48hrs for the dirsync to complete progress

4. At Office 365 > Exchange Online > Recipients > Mailbox

5. Search for the account > Double click on it

6. Go to Email Option > select the smtp address to edit

7. Remove the random numbers from the smtp address

8. Save your changes

*Make sure you put this to lab test before trying it out in actual environment, just to get clear understanding what are you doing


References:

  1. https://support.office.com/en-us/article/Turn-off-directory-synchronization-for-Office-365-ee5f861e-bd48-4267-83d1-a4ead4b4a00d

Office365, Exchange, Azure, AD: Why you should always check your Office365 Recycle Bin?

Every human mistake is they never check what is inside their recycle bin before proceeding.

The very first thing you should do when you want to create a user is to check your Office 365 recycle bin! Why? Because is best to avoid another problem for yourself unless you are the problem. To also avoid duplication occur in Office 365.

Imagine yourself hitting the brick wall by creating and deleting repetition of a particular user account, setting yourself in panic moment and continue getting errors such as,

  1. Unable to get the user account to sync up to Office 365
  2. Incorrect user principal name
  3. Worst -> Incorrect Immutable ID

So ALWAYS CHECK OFFICE 365 RECYCLE BIN BEFORE PROCEEDING TO CREATE!

Office 365 & Azure Powershell: Why not to use -SearchString pipe to Set function command?

Even though that you type the following command and it return you a single result, and you thought that it would work but it will not work.

Example:

  1. First you try to get the user, and you able to retrieve a result

Get-MsolUser – SearchString “abc”

#Result
Name                     UserPrincipalName
———                     ——————————-

abc                           abc@domain.com

2. After getting the user, you try to pipe it to a Set function. However, you receive an error like below; this error indicates an exception is trigger in Microsoft  backend and prevent such command to proceed.

Get-MsolUser -SearchString “abc” | Set-MsolUserPrincipalName -NewUserPrincipalName “aaa@domain.com”

#Result

Set-MsolUserPrincipalName : Unable to update parameter. Parameter name: IMMUTABLEID.
At line:1 char:44
+ … abc” | Set-MsolUserPrincipalName -NewUserPrincipalName “aaa…
+ ~~~~~~~~~~~~~~~~~~~~~~~~~~~~~~~~~~~~~~~~~~~~~~~~~~~~~~~~~
+ CategoryInfo : OperationStopped: (:) [Set-MsolUserPrincipalName], MicrosoftOnlineException
+ FullyQualifiedErrorId : Microsoft.Online.Administration.Automation.PropertyNotSettableException,Microsoft.Online.Admi
nistration.Automation.SetUserPrincipalName

3. So the correct way to do it is to either

Get-MsolUser -UserPrincipalName “abc@domain.com” | Set-MsolUserPrincipalName -NewPrincipalName “aaa@domain.com”
OR

Set-MsolUserPrincipalName -UserPrincipalName “abc@domain.com” -NewUserPrincipalName “aaa@domain.com”

*Note: Please test it out before you implement