Exchange Migration: Windows 10’s Outlook kept prompting after turn off modern authentication

If you had read my previous/recent post about exchange migration on Windows 7, then today I’m writing a post about Windows 10. https://sabrinaksy.com/2021/10/14/exchange-migration-outlook-kept-prompting-for-password-after-migration/

It seems that after we turn off the modern authentication, there was no more further prompt issues with Windows 7 but Windows 10 on the next day is receiving prompt and with the user name shows as “contoso.onmicrosoft.com” domain instead of the “contoso.com” registered domain or default domain.

After research, we notice Microsoft just recently release an enforcement towards basic authentication on 1st October 2021. Hence, we have no choice to look for workarounds for Windows (7 and 10) to support Modern Authentication. The only workaround is to create a registry and amend them to the Windows machines.

Workaround

  1. Create a Group Policy Object in your Active Directory environment
  2. Under the Computer > Preferences > Windows Settings > Registry
  3. Create a new registry item
  4. This is the registry item that we want to create
    • Path: HKEY_CURRENT_USER\Software\Microsoft\Exchange
    • Value Name: AlwaysUseMSOAuthForAutoDiscover
    • Value: 1
    • Type: REG_DWORD
  5. Once you have created this policy and link it to the particular organization unit that contains the Windows machines
  6. Run a force group policy update from the Active Directory server
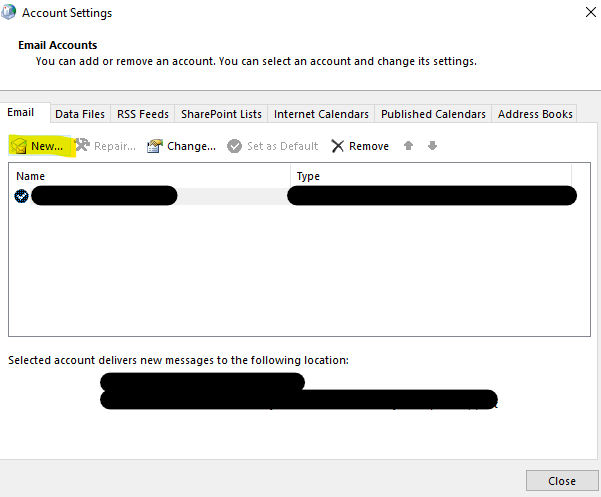
  7. Go back to the Office 365 admin center portal with Global administrator rights
  8. Settings > Org Settings > Modern Authentication > Turn on modern authentication
  9. Make sure you select all of the items under the modern authentication

  1. Monitor for the next 24 to 48 hours, for further prompt issues
  2. If there’s issues, troubleshoot the machine and check is registry amended if not just manually run it

You can always export the registry settings as .reg file format, so is easier to install on the affected machine(s) just by double clicking the .reg file.

How to export the registry file?

You can use the PowerShell’s Invoke-Command

Invoke-Command {reg export 'HKEY_CURRENT_USER\Software\Microsoft\Exchange' C:\Temp\ModernAuth.reg}

References:

  1. https://techcommunity.microsoft.com/t5/exchange-team-blog/basic-authentication-and-exchange-online-september-2021-update/ba-p/2772210
  2. https://docs.microsoft.com/en-us/outlook/troubleshoot/authentication/outlook-prompt-password-modern-authentication-enabled

PowerShell: Basic Understanding of Rows and Columns and CSV file

What’s up ladies and dudes!

Relation in this topic:

  1. Rows and Columns
  2. Loops
  3. CSV file
  4. PowerShell

I think playing with Rows and Columns is every beginner programmer’s nightmare. Rows and Columns concept is all the same for all coding languages. There’s no black magic here. Is all about the basic understanding and common sense. I’ve seen many fresh graduate find it difficult to understand the rows and columns and tend to overthink and turn their codes into a complex dark hole.

What you understand?

You come about FOR LOOP, WHILE LOOP or DO…WHILE LOOP. To identify Rows and Columns in loops form, let’s take FOR Loop as example, so below image is how you use the FOR Loop concept to get or apply table values. Inner FOR loop is define as your column, and the outer FOR loop define as your row.

So clear about it? In PowerShell, the concept is the same but it has been simplify with a command “Import-csv“.

What the beginners does?

This is the sample code that I have seen too much, in the beginners.

By apply this you will get duplicated result;

How PowerShell does it?

Now, let’s see the code for PowerShell, I’m going to show you how you get value list of rows and columns from Excel file, aka CSV file format.

This is the csv file for example, we have 2 columns with naming/attribute, UserPrincipalName and EmailAddresses as the first row. This is the view from excel and the view from notepad is different. Notepad, the columns are separated by a delimiter “,”

To put them into PowerShell, you just need a single FOR Loop to perform.

Lets output the result you will get is this, if you want to beautify your result is possible.

Is just that simple!

Intune & PowerShell: Creation of Email accounts automation on Outlook

Hey guys and girls, hope you all are having a good day. Today’s topic has a relation of 3 platform.

  • Intune/Microsoft Endpoint Manager
  • PowerShell
  • Outlook App (Windows)

This topic is more related to migration situations, so basically the environment is running IMAP and are on the stage of migrating to Office 365. Hence, to allow users to able to proceed to make use of the new mailbox and having to receive latest emails without disruption or downtime, would need to create the office365 email account on their Outlook profile.

If you notice that you have an email account, user@abc.com with the type “IMAP” on your outlook default profile, but you would like to also add the user@abc.com with the type “Microsoft Exchange” on the outlook default profile too. This is where the issue happen, majority would just proceed to try to add the account from the Outlook app but it will never let you successfully add the new account in and return with the message saying “This account has been added.” It seems to me that the Outlook App unable to differentiate TYPES. If you dig into Google Search you will only get articles, guiding you to create a new Profile just for the Office 365 account.

Wait…there is a solution to this. Please don’t bother raising case to Microsoft Support from Intune, if you’re lucky you will meet a support that willing to go extra miles for you. Usually the support would recommend you to turn on this feature from Intune “Automating the creation of outlook profile for Exchange Accounts” this only applies to new profile not existing profile.

So basically the solution is simple but I’m still unable to find an automation way to perform this. Hence, manually, but luckily is was just a small business organization, else I’m poof of words. Just type organization that is not willing to spent other migration products such as BitTitan and etc..

Anyway, to create an email account o the default outlook profile we would need to

  1. Launch your Start/Windows button
  2. Search for “Control Panel”
  3. Search for “Mail” in Control Panel
  4. Select the Mail > select “email accounts”
  5. Then select “New”
  6. Enter the following details and click Next
  7. Wait for the establish processing…
  8. You will now have 2 user@abc.com accounts in the default Outlook Profile with different types, IMAP and Microsoft Exchange.

If you are still wanting to go with having 2 profiles in Outlook to serve each types here is a simple PowerShell Script that you can upload to Intune;

#This is to create new Profile with the new Profile name
New-Item -Path "HKCU:\Software\Microsoft\Office\16.0\Outlook\Profiles\<Profile Name>" -Value ""

#This is to allow the prompt to users to choose which Outlook profile
Set-ItemProperty -Path "HKCU:\Software\Microsoft\Exchange\Client\Options" -Name "PickLogonProfile" -Value "1"

Exchange Online and Hybrid: How to capture/export last usage of Distribution List?

Distribution Groups

Hey everyone, how are you doing? So today’s topic is about how to capture last usage of distribution list. We encounter when we need to do clean up on the groups but imagine if you have thousand of groups that you have to check with the owners whether that the group is in use/active, sounds ridiculous right?

So I came across with this request and manage to found a very good reference on achieving this request.

Make sure you have PowerShell on your workstation to get the following result.

If you do not have appropriate permission to run the following command, below reference on how to get it work. If you have the appropriate permission or this is not your first time using PowerShell, then you can just launch your PowerShell as usual.

#Import the module
Import-Module ExchangeOnlineManagement

#Connect to Exchange Online
Connect-ExchangeOnline -Credential $usercredential

#Retrieve list of distribution list
$DistributionList = Get-DistributionGroup -ResultSize unlimited

#Get the message trace function to capture the last usage, a delay is needed to not stress of the throttling
$DistributionList | %{Get-MessageTrace -RecipientAddress $_.primarysmtpaddress ; write-host (“Processed Group: ” + $_.primarySMTPAddress) ; Start-Sleep -Milliseconds 500} | export-csv -Path C:\<filename>.csv –Append 

References:

  1. https://docs.microsoft.com/en-us/archive/blogs/timmcmic/office-365-create-a-report-of-distribution-group-usage
  2. https://docs.microsoft.com/en-us/powershell/exchange/connect-to-exchange-online-powershell?view=exchange-ps
  3. Set-ExecutionPolicy (Microsoft.PowerShell.Security) – PowerShell | Microsoft Docs

Exchange Online and PowerShell: How to extend Max Sent Size for your users in bulk?

Hey Guys and girls hope you all are taking care of your health and staying safe during this Covid-19 situation.

So here is just a simple blog post that I’m going to write about, if you are going to do some big changes towards your user’s mailbox features, of course PowerShell is the right method to perform.

As you may know that Microsoft have extend the max size of send message to 150MB, this is not default size but is a allow size for your necessary.

Here is the code;

#First you got to connect to the Exchange Online PowerShell to get the commands

Connect-ExchangeOnline -UserPrincipalName <Global admin UPN> -ShowProgress $true

#You would want to get the primary ID which is the recipient type details because you are going to make changes on the user mailboxes, this code will gather all mailboxes that are UserMailbox type and the change will take in.

Get-Mailbox -RecipientTypeDetails UserMailbox | Set-Mailbox -MaxSendSize 50MB -Verbose

#Next to get confirmation that all users has apply the change, write out the result or you could export it to csv, using the Export-Csv command

Get-Mailbox -RecipientTypeDetails UserMailbox | Select Name,MaxSendSize

That is about it! Simple as that!

References:

  1. https://docs.microsoft.com/en-us/powershell/exchange/connect-to-exchange-online-powershell?view=exchange-ps
  2. https://docs.microsoft.com/en-us/office365/servicedescriptions/exchange-online-service-description/exchange-online-limits#message-limits

PowerShell: Unable to delete Stuck Data Leak Policy using “-ForceDeletion”

Hi Guys and girls, hope you all are doing well, and remember to stay safe. Just got the PowerShell check on the command “Remove-DlpCompliancePolicy“, it seems that Microsoft had made some changes to it and had removed the “-ForceDeletion” parameter from the “Remove-DlpCompliancePolicy” command.

Appreciated and thanks to the commenter that ping me on this at one of my older blog post https://sabrinaksy.com/2019/01/04/office-365-security-and-compliance-data-leak-protection-dlp-azure-information-protection-aip-integration-unable-to-delete-dlp-policy/ .

Just to announce that if you would like to remove or delete the stuck DLP policy in Security and Compliance, you would have to raise a ticket to Microsoft and inform them to perform the force deletion at their backend. There are users experience this and it is resolved through Microsoft Support.


References

  1. https://docs.microsoft.com/en-us/powershell/module/exchange/remove-dlpcompliancepolicy?view=exchange-ps
  2. https://answers.microsoft.com/en-us/msoffice/forum/all/dlp-policy-stuck-on-deleting/6b7bc384-e330-4ca8-bfdd-f84101f814c8

How to change Forest Functional Level and Domain Level?

Note:

Make sure you have Enterprise Admin account/permission to run this command and run the PowerShell as Admin. 

If you run into error that you can’t bring up a new Domain Controller due to Operating System is not in the suitable forest functional level, this solution could help you out. RODC is not accepted to run these commands.

I am not sure whether does this require FSMO roles to make the changes towards these functional levels. Hence, I run these commands on the Primary domain controller.

  1. Login to your existing domain controller using an enterprise admin account
  2. Run the Windows PowerShell as Admin
  3. Type in the following command to change the forest functional level
    • #Get Forest level Info
      Get-ADForest
      
      #To Set the forest level
      Set-ADForestMode -ForestMode <Operating System Name>
      
      #Example: Set-ADForestMode -ForestMode Windows2012R2Forest
  4. Type the following command to change the domain level
    • #Get Domain level Info
      Get-ADDomain
      
      #To Set the forest level
      Set-ADDomainMode -DomainMode <Operating System Name>
      
      #Example: Set-ADDomainMode -DomainMode Windows2012R2Forest


Would recommend that you study on the difference between Forest Functional Level and Domain level. I would write a blog post about it soon!


Troubleshoot Hard Matching Immutable ID, Failed with Error “Uniqueness Violation”

When you perform a hard matching via PowerShell and you notice that once you run the Set-MsolUser command on the correct account, it return an error “Uniqueness violation. Source anchor”. Hmm what could be the cause for this error???

Well the reason for the cause of this error is obvious that there is still existing duplicated account is still not fully removed from Active Users list and Recycle Bin.

 Note:

This post requires you to know the basic commands like Connect-MsolService, Set-MsolUser, Remove-MsolUser and Get-MsolUser.

So what you got to do is to run the remove command to remove the duplicated account. Once fully remove from the Active Users list and Recycle Bin, you could continue to set the immutable ID on the correct account.

Oh yea….if the account that you wish to set the new or correct immutable ID make sure it is empty or cleared before you set the new or correct ones.

Happy PowerShell!


PowerShell: WinForm GIF Player for Fun


I just notice I forgotten to blog about this experience. It may seem useless, but I had a fun Sunday spending on it.

Anyway, here is the code for it, you could improve it.

*Note: Highlighted in YELLOW needs you to change it!

#Create a form

Add-Type -AssemblyName System.Windows.Forms

$Form = New-Object System.Windows.Forms.Form

$Form.AutoSize = $true

$Form.StartPosition = "CenterScreen"

Write-Host "Running GIF Player ..."


#Adding some text

$Form.Text = "GIF Player"

$Label = New-Object System.Windows.Forms.Label

$Label.Location = New-Object System.Drawing.Size(0,0)

$Label.AutoSize = $true

$Label.Font = New-Object System.Drawing.Font ("Comic Sans MS",20, [System.Drawing.Fontstyle]::Bold)

$Label.Text = "Hello Sunday ~"

$Form.Controls.Add($Label)


#Get the local saved GIF

$gifBox = New-Object Windows.Forms.picturebox

$gifLink= (Get-Item -Path '<filepath>\cathello.gif')

$img = [System.Drawing.Image]::fromfile($gifLink)

$gifBox.AutoSize = $true

$gifBox.Image = $img

$Form.Controls.Add($gifbox)


#Execute the form

$Form.ShowDialog()


GIF.PNG


PowerShell: PowerShell with MFA

It seems that more users are heading to enabling MFA but when it comes to managing via PowerShell, it can’t seem to login with their credential on normal PowerShell module.

When you have MFA enabled, you got to install the module  that’s support MFA. Pretty extra right? haha yea I know. Administrators tends to prefer GUI to manage but on other occasion we still need PowerShell to manage our cloud services.

To search for the PowerShell module tends to be a little tricky but hey I’m here to help you.

So enough of chit chat….let’s get it on!

First of all you got to open up your Exchange Online Portal > hybrid > Select the second option; Not the first option!

Capture

Note:

*Make sure your laptop or computer has the latest .Net Framework to support this module and supported Windows Operating System.

Once you got it install it will create a shortcut for you;

Capture

Anyway, do expect the Connect command will be the same as the usual PowerShell module.

Connect-EXOPSSession – Exchange Online

Capture.PNG

Connect-IPPSSession – Security and Compliance

Capture

References:

  1. https://docs.microsoft.com/en-us/powershell/exchange/exchange-online/connect-to-exchange-online-powershell/mfa-connect-to-exchange-online-powershell?view=exchange-ps