Azure ATP: How to setup a gMSA account?

Hey guys hope you all are staying indoors and cautions about your health. Today’s blog post is to understand what is gMSA account, how to create them and why does it required for setting up Azure ATP (a.k.a Microsoft Identity Defender ATP).

gMSA stands for group managed service account, below reference that you can refer to understand details about it. You only need to setup a gMSA account for Windows Server version 2012 and above, it is recommended to use gMSA account for you Azure ATP deployment if your Domain controller fall on the versions 2012 and above.

Why gMSA and not usually service account (user object)? It improves the security and automatic password management. It works similar as a managed service account functionality and with extended capabilities, such as password is being managed by your Active Directory and every 30 days a new password is assigned to this service account automatically. If you have mix of legacy domain controllers and newer version of domain controllers, you would need both type of service accounts.

Note:

  • Azure ATP directory service connection, doesn’t required a gMSA account, to be a member of domain admin
  • If your server doesn’t have the root key created, then run the Add-KdsRootKey command with following parameter “-EffectiveTime“, with value immediately or scheduled.

For this Azure ATP case, all domain controllers with sensor must have managed password permission/right on the gMSA account. Make sure your account has a domain admins right to be able to perform the following setup below;

How to setup a gMSA account?

  1. On your domain controller
  2. Open/Launch PowerShell cmdlet
  3. Type the following command
    New-ADServiceAccount -Name <ATP service account name> -DNSHostName <FQDN of 1 of your domain controller> -PrincipalsAllowedToRetrieveManagedPassword <domain controller hostname01$>,<domain controller hostname02$>
  4. Sample of the command
    New-ADServiceAccount -Name AzATPSvc -DNSHostName DC01.contoso.com -PrincipalsAllowedToRetrieveManagedPassword DC01$, DC02$
  5. Retrieve your change result command
    Get-ADServiceAccount -Identity AzATPSvc -Properties PrincipalsAllowedToRetrieveManagedPassword
  6. Testing the service account command
    Test-ADServiceAccount -Identity AzATPSvc

If your customer is highly concerns about what sort of permission this account is assigned you may run the command below;

  1. Get-ADServiceAccount -Identity AzATPSvc -Properties MemberOf
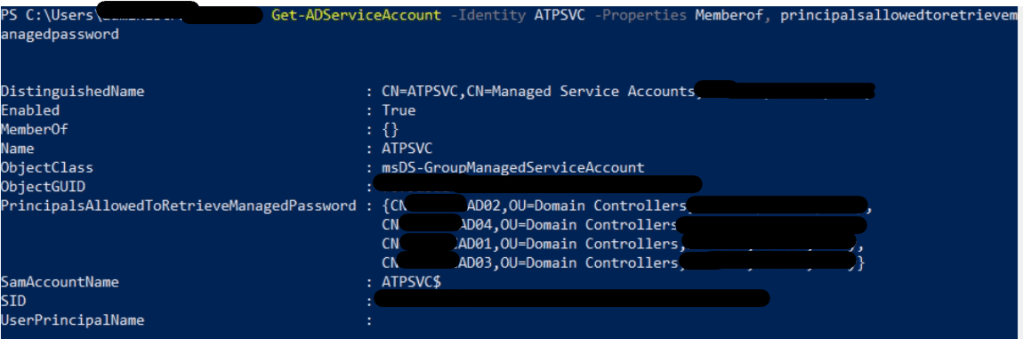
Sample image

References:

  1. https://docs.microsoft.com/en-us/defender-for-identity/prerequisites#-sensor-requirements
  2. https://docs.microsoft.com/en-us/windows-server/security/group-managed-service-accounts/getting-started-with-group-managed-service-accounts#BKMK_AddMemberHosts
  3. https://adsecurity.org/?p=4367

Azure AD Connect: Event code 8344 – Permission issue

Hey guys hope you are doing well today, today blog post is about Azure AD Connect permission issue. If you have been doing new infra deployment for years and very less in terms of troubleshooting and yes you will not expect what is the cause to this problem. The impact of this problem, is that user’s password won’t able to be sync to office 365 and they will have issue login to their office 365 portal and would required reset of their password from office 365 portal.

I had written about this issue before but it was 2018, the version of Azure AD Connect was much older. If you look into the Azure AD Connect deployment Microsoft article, version about 1.148 would required a write permission for the attribute “ms-ds-consistencyguid” to the service account that you are using to deploy the Azure AD Connect.

Minimum permission required for the service account are:

  1. Replicate directory changes
  2. Replicate directory changes all
  3. Write permission , for attribute ms-ds-consistencyguid

After providing the permissions to the service account, you would need to re-run the Azure AD Connect execution file or tool, for the changes that you made to that service account to take reflect.

Example image

After that the sync would start to run and I notice that are still some accounts giving “permission issue” error. So the next dependency was looking into the “inheritance” function, was it disable or not. I was able to identify that the particular OU have its inheritance enabled but on the single user object inside that OU, its inheritance was disabled.

This inheritance is from user’s object > Security tab > Advanced, at bottom.

References:

  1. https://docs.microsoft.com/en-us/azure/active-directory/hybrid/reference-connect-accounts-permissions

Microsoft Endpoint Manager ATP: Onboarding Methods For Windows 10

Hey fellow humans, how are you guys doing? With this covid-19 happening around us, hope that you are cautions about your health and safety of yourself and others too. I still can not believe that there are people still thinks that this virus is a myth. It really hurts to see the increases of cases in Malaysia has reach 4 thousand covid-19 cases yesterday in a day.

Anyway, lets start this blog post with another ATP, if you are new with this technology ATP stands for Advanced Threat Protection. My last post about ATP , is Azure ATP / Microsoft Endpoint Identity Defender ATP, do feel free to read about it.

This blog post would be about onboarding methods Endpoint to Microsoft Endpoint Defender ATP, if you haven’t notice Microsoft has launch 1 new onboarding methods that you can enroll for your lab environment or customers.

If you are new to the ATP here are the steps to get these methods;

  1. Sign up for a Office E3 trial license
  2. Setup the account
  3. Sign in to Office 365 Admin center> Billing > Select Purchases Services
  4. Under the purchases services select M365 E5 trial license
  5. Assign your Office 365 account with M365 E5 license
  6. Would take an hour or few minutes for the ATP Admin portal to setup for ready to use
  7. Head to Microsoft Endpoint Manager Admin Center
  8. At the side bar you can see “Endpoint security” > Setup > Microsoft Defender ATP
  9. There you would need to start setup of the Microsoft Defender ATP, it only takes 5 mins to setup, yes from the setup page here you may able to view the onboarding methods too but is only one-time setup page, so the actual location of this onboarding is at their Microsoft Defender ATP Admin portal.
  10. Enter the Microsoft Defender ATP Admin portal and there it will direct you to another portal where all the Endpoint’s onboarding , offboarding, analytics and etc.. located
  11. At the side bar > Select Settings icon > Device Management > Onboarding
Onboarding methods

As you can see the above image, these are the following onboarding methods that you can use to onboard your endpoint devices.

  1. Local Script
    • Has limitation, per script only for 10 devices. Meaning that Script 1 has been used for 10 devices and to enroll the number 11 device you would need to re-download the new script package from the onboarding method.
    • If you are doing a quick lab this would be the best method to test the onboarding
  2. Group Policy
  3. Microsoft Endpoint Configuration Manager current branch and later
  4. System Center Configuration Manager 2021 /2012 R2/1511/1602
  5. MDM/Microsoft Intune
  6. VDI onboarding scripts for non-persistent devices

Onboarding are run at the backend of your endpoint, and it dependent on the licenses that you purchase and also the environment type. Meaning if your environment has SCCM then you would need to use the SCCM onboarding method to enroll the devices to Microsoft Defender ATP.

Microsoft has really ease quite a lot for administrators work in enroll their devices to ATP services and having integration between ATP and other security features inside. I will write more about it on the next blog post. Have a nice weekend!

References:

  1. https://docs.microsoft.com/en-us/windows/security/threat-protection/microsoft-defender-atp/onboard-configure
  2. Microsoft Defender for Endpoint – Windows security | Microsoft Docs
  3. https://docs.microsoft.com/en-us/windows/security/threat-protection/microsoft-defender-atp/configure-endpoints

Azure Exam: AZ-500 How to pass the exam?

Good day, I’ve been receiving requests asking me how did I manage to pass the AZ-500 exam, which I just recently took it, on 22nd December 2020. I’m writing a blog post about it because I can’t go one by one to reply you guys.

There was 60 questions, including (1) case study, (10) true and false questions and (40) objective questions. If not mistaken.

There were no labs in this exam. If you were the earlier adopters for this exam and yes there was a requirement of completing a lab in this exam.

The exam was mainly focusing on

  1. Your understanding of OSI layers *
  2. Steps on encryption and decryption of SQL and databases.
  3. RBAC
  4. Azure AD Connect deployments
  5. Network access and privileges
  6. Access and privileges of virtual servers
  7. Where to get Reports from, for different platform based on the types of Azure services

To be honest, without proper understanding and reading the questions and OSI layers concept you would have slight chances of passing this exam. If you have experiences with Azure services, then you won’t need to worry much about the exam. I would recommend you to prepare yourself with the following reference links below, it would give you help on passing this exam.

All the best and good luck ahead!

References

  1. https://microsoftlearning.github.io/AZ500-AzureSecurityTechnologies/

Azure ATP: Azure ATP capabilities and mechanism

Hey everyone, hope you guys had a wonderful day. Starting of a new year 2021. I hope everyone stay healthy and stay safe distance from one another or avoid crowded places.

I know that this pandemic has test us in many ways, in terms of physically and mentally. If you manage to get through year 2020 challenges, then give yourself a pad on the back, you did good.

This blog post I’m going to write about what is Azure ATP, before I jump into the topic, I want to say that security is a journey. If you guys have read about the recent news about attacks rises double/triple in the year 2020 and also the news about solarwinds attack, then these are enough proof that hackers are given more chances to attack in this situation, because they know majority businesses or corporates are still vulnerable or not up to par in terms of securing their environment and providing security training to users. Users mistakes in allowing attackers are also risk to the corporate that is why users training is still important to corporates. Losing money/profit to attackers is twice painful to the corporates then purchasing and implementing security technologies/products in the environment. Let’s take ransomwares as an example for this case. Due to this pandemic, I notice quite an amount of corporates are now implementing the concept of “Zero-trust“. If you would like to know what is “Zero-trust”, do feel free to Google them up.

Anyway, alright lets start our topic. The ATP term has been quite awhile in the security industry, or if you still not too sure what is ATP, ATP stands for Advanced Threat Protection. It contains advanced intelligent technology and combination of algorithms to identify and investigate types of malicious behavior and it will select appropriate action to quarantine/block the malicious actions before doing any harm to the environment and provide deep dive detailed reports to administrators.

Azure ATP has been known quite awhile in Microsoft 365, and Microsoft had given a different naming, Microsoft Identity Defender. It’s capability is to:

  1. Identify compromised accounts
  2. Investigate malicious activities of accounts
  3. Provide best practice security actions to administrators on how to handle accounts that reported by Azure ATP as suspicious or compromised
  4. Provide detail visibility authentication of attacks
  5. Azure ATP able to provide details of attack’s source
  6. Reports are real-time and signals back to Microsoft Identity Defender portal

This is just a summary of the entire structure looks like implementing Azure ATP into the environment with Domain Controllers only.

Azure ATP agent is only for on-premises like Domain controllers and ADFS and the agent will send a signal back to Microsoft Identity Defender if detected malicious activities or compromised accounts. I do recommend that you read more about requirements of deploying Azure ATP, before deploying into your customer’s environment. There is a medium impact required.

References

  1. What is Microsoft Defender for Identity? | Microsoft Docs
  2. Microsoft Defender for Identity architecture | Microsoft Docs

Exchange Online and Hybrid: How to capture/export last usage of Distribution List?

Distribution Groups

Hey everyone, how are you doing? So today’s topic is about how to capture last usage of distribution list. We encounter when we need to do clean up on the groups but imagine if you have thousand of groups that you have to check with the owners whether that the group is in use/active, sounds ridiculous right?

So I came across with this request and manage to found a very good reference on achieving this request.

Make sure you have PowerShell on your workstation to get the following result.

If you do not have appropriate permission to run the following command, below reference on how to get it work. If you have the appropriate permission or this is not your first time using PowerShell, then you can just launch your PowerShell as usual.

#Import the module
Import-Module ExchangeOnlineManagement

#Connect to Exchange Online
Connect-ExchangeOnline -Credential $usercredential

#Retrieve list of distribution list
$DistributionList = Get-DistributionGroup -ResultSize unlimited

#Get the message trace function to capture the last usage, a delay is needed to not stress of the throttling
$DistributionList | %{Get-MessageTrace -RecipientAddress $_.primarysmtpaddress ; write-host (“Processed Group: ” + $_.primarySMTPAddress) ; Start-Sleep -Milliseconds 500} | export-csv -Path C:\<filename>.csv –Append 

References:

  1. https://docs.microsoft.com/en-us/archive/blogs/timmcmic/office-365-create-a-report-of-distribution-group-usage
  2. https://docs.microsoft.com/en-us/powershell/exchange/connect-to-exchange-online-powershell?view=exchange-ps
  3. Set-ExecutionPolicy (Microsoft.PowerShell.Security) – PowerShell | Microsoft Docs

aOSKL 2020: How secure your endpoint protection?

Hey guys and girls, hope you are having a good day. I know is Monday Blues, I was having the blue mood this morning, not a good way to start the new day. Anyway, Covid-19 is still high alert in our area, it went from 600 to 800 users per day affected. Please don’t travel as a huge group, stay concern about people around you.

Is almost end of 2020, and here is another event that I am going to speak at, virtually of course. This is my 3rd year speaking at aOS Community event. Every year is a new experience and meeting new people in this event.

This year event, I’m going to talk about Endpoint Protection. Do register yourself if you are interested in this event.

Peace Out!

Exchange Online and PowerShell: How to extend Max Sent Size for your users in bulk?

Hey Guys and girls hope you all are taking care of your health and staying safe during this Covid-19 situation.

So here is just a simple blog post that I’m going to write about, if you are going to do some big changes towards your user’s mailbox features, of course PowerShell is the right method to perform.

As you may know that Microsoft have extend the max size of send message to 150MB, this is not default size but is a allow size for your necessary.

Here is the code;

#First you got to connect to the Exchange Online PowerShell to get the commands

Connect-ExchangeOnline -UserPrincipalName <Global admin UPN> -ShowProgress $true

#You would want to get the primary ID which is the recipient type details because you are going to make changes on the user mailboxes, this code will gather all mailboxes that are UserMailbox type and the change will take in.

Get-Mailbox -RecipientTypeDetails UserMailbox | Set-Mailbox -MaxSendSize 50MB -Verbose

#Next to get confirmation that all users has apply the change, write out the result or you could export it to csv, using the Export-Csv command

Get-Mailbox -RecipientTypeDetails UserMailbox | Select Name,MaxSendSize

That is about it! Simple as that!

References:

  1. https://docs.microsoft.com/en-us/powershell/exchange/connect-to-exchange-online-powershell?view=exchange-ps
  2. https://docs.microsoft.com/en-us/office365/servicedescriptions/exchange-online-service-description/exchange-online-limits#message-limits

Azure Autopilot: Unable to delete managed Autopilot devices

Hey guys and girls, hope you are enjoying your weekends. Please do keep a safe distance while you are in public area and wearing your mask.

So while I was doing my lab testing and wanting to remove the device from managed autopilot but it was failed to do so, due to the device were managed by Intune. Below is the error, if you would try to delete the device object from Autopilot.

To resolve this issue, is to remove the device from Intune and then you could able to remove the device from Autopilot.

As you may know that Intune is now no longer to be found in Azure portal, and it has moved to Microsoft Endpoint Manager admin center portal.

Steps to proceed to resolve this issue are;
  1. Access or login with your necessary credential that has permission to enter Microsoft Endpoint Manager admin center
  2. One the left taskbar, Select on Devices
  3. Select platform : Windows
  4. Search for the device name that you would wish to remove
  5. Once the device is found, select on the device and click Delete
  6. For the device to be deleted, will take around 3 to 5 mins
  7. Click on the Refresh, to make sure the device is completely deleted
  8. Once the device object is completely deleted, on the left taskbar select on Devices
  9. Select Enroll Devices
  10. Select Windows enrollment
  11. Select Devices Managed Autopilot
  12. Search for the device and Select the device that you wish to remove
  13. Click Delete and you have successfully delete the device from Autopilot

PowerShell: Unable to delete Stuck Data Leak Policy using “-ForceDeletion”

Hi Guys and girls, hope you all are doing well, and remember to stay safe. Just got the PowerShell check on the command “Remove-DlpCompliancePolicy“, it seems that Microsoft had made some changes to it and had removed the “-ForceDeletion” parameter from the “Remove-DlpCompliancePolicy” command.

Appreciated and thanks to the commenter that ping me on this at one of my older blog post https://sabrinaksy.com/2019/01/04/office-365-security-and-compliance-data-leak-protection-dlp-azure-information-protection-aip-integration-unable-to-delete-dlp-policy/ .

Just to announce that if you would like to remove or delete the stuck DLP policy in Security and Compliance, you would have to raise a ticket to Microsoft and inform them to perform the force deletion at their backend. There are users experience this and it is resolved through Microsoft Support.


References

  1. https://docs.microsoft.com/en-us/powershell/module/exchange/remove-dlpcompliancepolicy?view=exchange-ps
  2. https://answers.microsoft.com/en-us/msoffice/forum/all/dlp-policy-stuck-on-deleting/6b7bc384-e330-4ca8-bfdd-f84101f814c8