Troubleshoot ADFS Token Signing and Decrypting Cutover

I read through many articles and done much research, and I really thought that the AutomaticRolloverCertificate function would take up its work seamlessly but guess what it didn’t. Well, it did generate the new token correct and changing the new token to the Primary and append the changes to Office 365 federation but it wasn’t able to update the changes in Office 365 federation.

I am not sure whether is this got to do with a single domain environment.

*Note:

Commands/PowerShell you can only run from Primary ADFS unless you had run some PowerShell to allow session establish from another computer. (Which is also fine to proceed, as long as you could establish the connection)

Impact:

  1. Federated Users unable to login

aadc01.PNG


Actions are taken:

  1. I have checked the event logs
    • Noticed there is an error about Event ID 111 WS-Trust or Value is null unable to perform the update
    • token01
  2. I have query the output via PowerShell from ADFS server
    • Connect-MsolServices
    • Key in Your Office 365 Global Admin credential (the xx@domain.onmicrosoft.com)
    • Get-MsolFederationProperty -DomainName domain.com

Based on the above 2 actions, I have noticed that it didn’t update the federation in Office 365. It was able to append the changes of the new tokens to the Office 365 but it didn’t update.

Next was;

  1. Run the PowerShell command from primary ADFS to force the update of the new token for Office 365

Connect-MsolServices

#enter your onmicrosoft.com global admin credential

Update-MsolFederatedDomain -DomainName domain.com -SupportMultipleDomain

#Check whether the token in office 365 is updated

Get-MsolFederationProperty -DomainName domain.com

2. Then Restart ADFS services, restart from primary ADFS then to the secondary ADFS

3. Retry to access portal.office.com, then you should be able to access


I am trying to simplify this situation with PowerShell Scripting…so stay tuned!

References:

  1. http://terenceluk.blogspot.com/2016/05/the-message-one-of-your-on-premises.html
  2. https://piasys.com/blog/microsoft-office-365-adfs-and-signingencrypting-certificates-renewal/
  3. http://jackstromberg.com/2014/11/office-365-renew-your-certificates-on-premise-adfs-alert/

Office 365 Security and Compliance: Data Leak Protection (DLP) & Azure Information Protection (AIP) Integration Unable to delete DLP Policy

Well hello! I’m back, yes I had been very busy last 2 months unable to write any new blog.

So when I was testing and playing with DLP and AIP in my test environment and I had 2 testing integration policy running and I found there was something wrong with my DLP policy and I went to trigger the delete via GUI at Security and Compliance and it basically will change its status to “Deletion pending” state. I know sometime these deletion takes up  to 48 hours. However, it was more than 48 hours and the DLP policy is still showing the status “Deletion pending”.

So its time to use PowerShell to solve this deletion pending problem;

*Take Note;

If you try to run the “Remove-DLPCompliancePolicy” this PowerShell without using the “ForceDeletion” to delete this policy it won’t work and you will return with an error;

#Sample PowerShell
Remove-DlpCompliancePolicy -Identity 58bed0c6-fbf9-41c4-b798-fdec65beae1c

We cannot remove policy ‘TopSecret_policy’ since it is already in pending deletion state.
+ CategoryInfo : InvalidOperation: (:) [Remove-DlpCompliancePolicy], ErrorCannotRemo…PolicyException
+ FullyQualifiedErrorId : [Server=xxxxxxxxxxxxxxx,RequestId=xxxxxxxx-xxxxx-xxxx-xxxxx-xxxxxxxxxxx5,TimeStamp=4/1/2019
8:26:50 AM] [FailureCategory=Cmdlet-ErrorCannotRemovePendingDeletionPolicyException] xxxxxx,Microsoft.Office.Com
pliancePolicy.Tasks.RemoveDlpCompliancePolicy
+ PSComputerName : apc01b.ps.compliance.protection.outlook.com

What to do?

  1. First of all you need to using PowerShell and connect to Security and compliance
    1. https://docs.microsoft.com/en-us/powershell/exchange/office-365-scc/connect-to-scc-powershell/connect-to-scc-powershell?view=exchange-ps
  2. Next run the command below to get your DLP information

Get-DLPCompliancePolicy | select Name, Guid

3. Than run this command

Remove-DLPCompliancePolicy -Identity “Policyname” -ForceDeletion

OR

Remove-DLPCompliancePolicy -Identity “Policy GUID” -ForceDeletion

4. Select “A” , A is Yes to All

Below is a sample;


Capture


References:

  1. https://sabrinaksy.com/2020/07/25/powershell-unable-to-delete-stuck-data-leak-policy-using-forcedeletion/

PowerShell: How to export values into table format .csv file?

Again I’m no expert in PowerShell, it took me few hours to figure it out. Searched many articles but are difficult for me to understand.

However, the answer was right under my nose. Please refer to the reference I’ve include below this blog. Sorry about the attribute naming, well this is only an example. Hope this helps.

*Note:

  • Always run this(PowerShell) on a test account before moving production (bulk).
  • This script only supports PowerShell version 3.0 or above

Here is an example of what I’m saying;

#Purpose: This powershell is to get the office phone and copy 
#the last 4 digit into a temporary programming attribute and than 
#merge with a string value with the last 4 digits
#Export the user's name, office phone and New Phone

#Merge value
$merge= "123"

#Get the filename
$users = import-csv .\file.csv -delimiter ","

foreach ($i in $users)
{
#Attributes
$name = $i.Name
$officephone = $i.OfficePhone

#If the user's OfficePhone has value
if ($officephone -ne "")
{
#Copy the last 4 digit of the OfficePhone
$lastfourdigit = $officephone.substring($officephone.length - 4)
#Merge the string value with the 4digit to create a new phone number
$newvalue= $merge + $lastfourdigit

#Table format for csv
$content = [PSCustomObject]@{Name = $name; OfficePhone = $officephone; NewPhone= $newvalue}
#Export the table to new csv file
$content | Export-csv newfile.csv -Append

}
else{
#Table format for csv
$content = [PSCustomObject]@{Name = $name; OfficePhone = $officephone; NewPhone= ""}
#Export the table to new csv file
$content | Export-csv newfile.csv -Append

}

}

So the end result is;

newfile


I prefer to keep my codes simple and understandable.

Reference

  1. https://docs.microsoft.com/en-us/powershell/module/microsoft.powershell.utility/export-csv?view=powershell-6

Exchange Hybrid & PowerShell: How to customize a permission of a role?

Again not brain surgery. Just need you to calm your mind and enjoy understanding it.

Yes, I know that there would be defaults settings or features that doesn’t mean the customer’s requirement, so they always requested for customization.

So basically I expect that you know what are the default roles in exchange hybrid and its permissions inside. Anyway, you have to be the administrator only you could able to view where are the roles. You can find it at your exchange hybrid console > Permission > Admin roles.

*Note:

  • I prefer to use Power Shell to create this customize permission role because it provides more details of what are the functions runs in each role type.
  • And you can dig deeper by removing/adding certain role’s type function that you would not wish to be in your customization.
  • Try not to configure the default roles given
  • Always create a new role

Using Interface to create Admin Roles Group

However, interface doesn’t actually allows you to create customize roles.

To create a new customize permission role you go to this directory Exchange Hybrid console > Permission > Admin roles > “+”

Example below;

Capture01

Select what roles you want for your customize permission;

Capture02.PNG

Using Power Shell to create customization

What I would do is I will copy a default role and its permission into my new role, which is closer to my client’s request and than I will eliminate the permission based on a comparing function such as “Query if the role’s permission doesn’t has this permission than remove the those permission”. This will definitely save much more time.

If you aren’t sure about  what default role should you copy than try to extract the detail list of each roles permission. Simply just type the following code below;

Get-ManagementRole * | Get-MangementRoleEntry
  1. Go to your Exchange Hybrid Server > Open the Exchange Power Shell console (Run as Administrator)
  2. Run these commands below
    #To get a list of role type
    Get-ManagementRole
    
    #Get function details of each role type
    Get-ManagementRole "RoleTypeName" | Get-ManagementRoleEntry
    
    #Create a new Customize Role copying a default role type
    New-ManagementRole -Parent "RoleTypeName" -Name "NewCustomizePermissionRoleName"

    *RoleTypeName would be these at the picture below, circle in red

    Capture01
    Role type name

    Get-ManagementRoleEntry is basically get the list of permissions that is inside the role.

    *Each roles has its own list of permissions

  3. If you wish to limit or remove a role type’s function/permission, than you can run this command
#Find your customization that you had created
#Query where if the function is not the name "Get-RemoteDomain" & "New-RemoteDomain" remove the other's functions
Get-ManagementRoleEntry "NewCustomizePermissionRoleName\*" | Where { $_.Name -NotLike "Get-RemoteDomain" -and $_.Name -NotLike "New-RemoteDomain" } | Remove-ManagementRoleEntry

#Query your modified customization, to check whether are the modification correct
Get-ManagementRoleEntry "NewCustomizePermissionRoleName\*"  | select name,role | ft

#If you wish to undo than just run this command
#It will get the function "Get-Mailbox" from Role Type and add into your customization
Get-ManagementRoleEntry "RoleTypeName\Get-Mailbox" | Add-ManagementRoleEntry -Role "CustomizePermissionRoleName"


References:

Exchange 2016: “Database is mandatory on UserMailbox”

When you are setting up a new exchange server to upgrade the current exchange server, with all the prerequisite has been applied and the next step is the run the setup.exe file of the exchange CU. However, you notice that the interface of the setup has stop at Step 7 which is “Mailbox role setup” because of an error encounter.

Usually the interface doesn’t really provide you the detail reason of error occur.

“Mailbox role: Transport service : Error”

Example:

Untitled picture

To know get more understanding of the error, Go to > Windows Explorer > open C:\ Drive > Select Exchange Setup Log Folder > Open Exchange Setup txt file > Scroll to the bottom to get the details.

Example:

Capture

*Error: Database is mandatory on UserMailbox;

Below is the sample logs and error that causes the setup to stop, and it seems that there is a system mailbox “SystemAttendantDependent_xxx” found corrupted. Usually if is corrupted means that this account’s the value of HomeMDB attribute is empty. The solution to this is to add the correct value for HomeMDB attribute of the corrupted account.

capture1-e1525890833997.png

Here how it is done;

  1. To find whether are there any other corrupted mailboxes;
    • Open your current exchange server’s powershell
    • Run this command
      • Get-Mailbox -Arbitration | Select Name, Database
      • Then it will show you number of corrupted mailboxes with WARNING stated
  2. Go to ADSI Edit > Connect to Default naming context  > Users container > search for a valid user account with mailbox > Open properties
  3. Find the attribute HomeMDB > Copy the value (*Optional: You can paste the value into a notepad for temporary)
  4. Go to ADSI Edit > Connect to Default naming context  > Users container > search for a corrupted account > Open properties
  5. Find the attribute HomeMDB > Replace the empty box with the copied value
  6. * Do this for corrupted mailboxes that you found, which is blocking your success to complete setup of your new exchange.
  7. Rerun the setup.exe
  8. If successful setup than continue with the post-installation.

*Note:

There could be other related corrupted account (Can’t be find from the exchange powershell) that has blocking your success to complete setup of your exchange. Please look into details of the logs to find out what are the other corrupted accounts and replace their empty value attribute with the correct ones.

Office 365 & AD & Exchange Hybrid: How to create remote mailbox in Exchange Hybrid for existing user, in Active Directory and Office 365?

When you have existing user active directory record and you’ve accidentally had provision the mailbox at Office 365. Thus, result you unable to add the user into any distribution group and etc. because it doesn’t have record in Exchange Hybrid. Besides, user’s primary email address wasn’t correct, such as “xxxx@domain.onmicrosoft.com” instead of “xxxx@domain.com”.

Here are the steps to resolve your problems;

Implication: None (for me)

*Note: You have to be familiar with PowerShell. Best to try it on a test user account first.

  1. Go to Exchange Hybrid server
  2. Open Exchange Powershell Management
  3. Type the following commands;

    Enable-remotemailbox “userDisplayName” -RemoteRoutingAddress “xxxx@domain.mail.onmicrosoft.com”

  4. Go to Azure AD Server
  5. Open Windows Powershell

    Start-ADSyncSyncCycle -PolicyType Delta

  6. You will than review that particular user’s the mailbox in Office 365, has more email addresses shown in the email address category itself. And also the Primary email address has change to the right one.


*Note: This may take half an hour for the overall settings to be propagated at the user side. Because at the user side they will still view their primary smtp as the incorrect one, even though the modification has done.

Active Directory: How to export Active Directory User with all attributes?

I know that the below command will not be as effective but it does the job.

Step-by-Steps

  1. Go to Active Directory/Domain Controller
  2. Open Powershell as administrator
  3. Type the following command below;

Get-ADUser -Properties * -Filter * | Export-csv “ADUserattributes.csv”

OR

Get-ADUser -Filter * -Properties * | Export-csv “ADUserattributes.csv”


The above command will export the list of AD Users with attributes and values in a csv file format, and all you need to do is to copy out the attributes and paste it in a new excel file, format it from column view to row view(optional).

*Note: You could modify the command as you wish


Office 365: Email address with random numbers attached UPN (user123@contoso.onmicrosoft.com)

Why do some of my users have random numbers attach with their UPN? Well the only answer to this question is, duplication occur because you haven’t force delete the old account from Office 365 recycle bin. And by default there is a setting in Azure AD to detect duplication is set to false, so this is another reason that even there are duplication in AD created and a sync has been trigger the duplication will also be sync to the Office 365.

To prevent any duplication in future to be sync to the Office 365, is to set the duplication checking in Azure AD to true. So that any duplication is scan will be rejected to be sync to the Office 365. To resolve the duplication currently having is to delete the account and resync it to Office 365.

*Note: These random numbers in your smtp has no implication or effects to your mailbox/account, but it is only not nice to see it that way. It is up to your choice to do it or not.

*Azure Module Power Shell needed

  1. Open Azure power shell
  2. Type the following command to get the sync feature

Connect-MsolService

Get-MsolDirSyncFeatures

dirsyncfeature

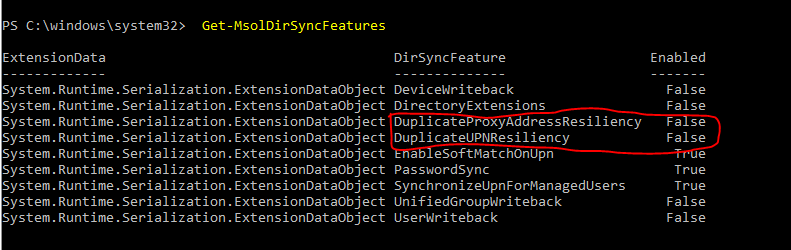
3. Next, enable both of the feature to true

Set-MsolDirSyncFeatures -Feature DuplicateUPNResiliency -Enabled $true

Set-MsolDirSyncFeatures – Feature DuplicateProxyAddressResiliency -Enabled $true


*Note:

Situation 1: If the mailbox is still new, you will only need to delete the account and force delete from the recycle bin, then do a resync 

Situation 2: If user have the mailbox for very long, you have to break the dirsync wait for the account’s status change from “Sync from on premise” to “on cloud“, then from Office 365 you can edit its smtp address but make sure you have your recycle bin clear from the old account. (Yes this is much troublesome than Situation 1)


Step by step for situation 1

  1. Locate the account from Office 356
  2. Unassign the mailbox license
  3. At Active Directory, move the account to a unsync organization unit
  4. At Azure AD Connect, run a manual sync command

Start-ADSyncSyncCycle -PolicyType Delta

5. Make sure the account at Office 365 has gone to the “Deleted User” Category

6. Once the account has been appear in “Deleted User” Office 365, you have to run a command to force deleted from the recycle bin.

7. Open Azure Module PowerShell

8. Type the following command, enter the UPN that you wish to remove from recycle bin

Connect-MsolService

Get-MsolUser -ReturnDeletedUser

Get-MsolUser -ReturnDeletedUser | Remove-MsolUser -UserPrincipalName xxxx@domain.com -RemoveFromRecycleBin -Force

9. After finish remove the account from recycle bin, move back the account from unsync Organization Unit to Sync Organization Unit

10. At Azure AD Connect, run the manual sync command

11. At Office 365, locate the account and assign license

12. You can notice there is no more random numbers found


Step by Step for Situation 2

*Make sure recycle bin is clear from duplication accounts

  1. Open Azure Module PowerShell
  2. Type the following command, enter the UPN that you wish to remove from recycle bin

    Connect-MsolService

    Get-MsolUser -ReturnDeletedUser

    Get-MsolUser -ReturnDeletedUser | Remove-MsolUser -UserPrincipalName xxxx@domain.com -RemoveFromRecycleBin -Force

  3. Open Azure Module Powershell
  4. Type the following command

Connect-MsolService

Set-MsolDirSyncEnabled -EnableDirSync $false

3. You probably have to wait for 24hr to 48hrs for the dirsync to complete progress

4. At Office 365 > Exchange Online > Recipients > Mailbox

5. Search for the account > Double click on it

6. Go to Email Option > select the smtp address to edit

7. Remove the random numbers from the smtp address

8. Save your changes

*Make sure you put this to lab test before trying it out in actual environment, just to get clear understanding what are you doing


References:

  1. https://support.office.com/en-us/article/Turn-off-directory-synchronization-for-Office-365-ee5f861e-bd48-4267-83d1-a4ead4b4a00d

Office 365 & Azure Powershell: Why not to use -SearchString pipe to Set function command?

Even though that you type the following command and it return you a single result, and you thought that it would work but it will not work.

Example:

  1. First you try to get the user, and you able to retrieve a result

Get-MsolUser – SearchString “abc”

#Result
Name                     UserPrincipalName
———                     ——————————-

abc                           abc@domain.com

2. After getting the user, you try to pipe it to a Set function. However, you receive an error like below; this error indicates an exception is trigger in Microsoft  backend and prevent such command to proceed.

Get-MsolUser -SearchString “abc” | Set-MsolUserPrincipalName -NewUserPrincipalName “aaa@domain.com”

#Result

Set-MsolUserPrincipalName : Unable to update parameter. Parameter name: IMMUTABLEID.
At line:1 char:44
+ … abc” | Set-MsolUserPrincipalName -NewUserPrincipalName “aaa…
+ ~~~~~~~~~~~~~~~~~~~~~~~~~~~~~~~~~~~~~~~~~~~~~~~~~~~~~~~~~
+ CategoryInfo : OperationStopped: (:) [Set-MsolUserPrincipalName], MicrosoftOnlineException
+ FullyQualifiedErrorId : Microsoft.Online.Administration.Automation.PropertyNotSettableException,Microsoft.Online.Admi
nistration.Automation.SetUserPrincipalName

3. So the correct way to do it is to either

Get-MsolUser -UserPrincipalName “abc@domain.com” | Set-MsolUserPrincipalName -NewPrincipalName “aaa@domain.com”
OR

Set-MsolUserPrincipalName -UserPrincipalName “abc@domain.com” -NewUserPrincipalName “aaa@domain.com”

*Note: Please test it out before you implement

Azure AD Connect (AADC): How to resolve Stopped-extension-dll-exception?

Usually this error will not have any effect to Office 365 Dirsync, but it is indeed annoying to see error in our Azure AD Connect Sync Client Interface. Is best to resolve this error.

There are only 4 possible causes;

  1. AADC is OUTDATED ()
    • Check for AADC version
    • If it is outdated than update it, run the sync again
    • Reference: https://docs.microsoft.com/en-us/azure/active-directory/connect/active-directory-aadconnect-upgrade-previous-version
  2. AADC’s schema crashes
    • Run the AADC application and restart the schema
    • Reference: https://docs.microsoft.com/en-us/azure/active-directory/connect/active-directory-aadconnectsync-installation-wizard
  3. Azure AD account Sync password is not set to “Password Never Expired”
    • *Note: By default, when you setup AADC this is already turn on
    • If you had turn this feature off,you have to update the password and enable the feature back on.
    • Run Azure PowerShell Module command
      • Connect-MsolService
      • #Set new password
        Set-MsolUserPassword
        -UserPrincipalName “XXXXXXX” -NewPassword “pa$$word
      • Set-MsolUser -UserPrincipalName "XXXXXXXXX" -PasswordNeverExpires $true
      • Restart the AADC service
      • #After restart runs finish, type this command
        Start-ADSyncSyncCycle -PolicyType Initial
  4. Server itself is having problem
    • Restart the server
  5. Permission missing
    • If you enable single sign-on, remember its minimum requirement of the permission rights for service account is domain admin
  6. DNS routing issue
    • If you notice that you are having trouble resolving “login.windows.net” this is due to your DNS settings in your DNS server/AADC server network settings
    • Most likely is DNS server settings, is configure wrongly
    • Try to run nslookup to identify the return result
    • If there is a forwarder in place, remove it.

The above causes are also the steps-by-steps investigation, and to resolve this error it is best to follow the above category and resolving them.

*Note: This error may occurs after few hours and it is best to monitor for 24 hours or 48 hours.