
Hey guys and girls, how are you all doing working from home? Please stay safe and keep your distance.
Today’s topic is about creating multiple root certificate in a single forest, please take note that this is not a best practice by Microsoft but it was the right solutions for my situations. There will not be errors/stopping you to proceed, if you setup multiple root certificate authority.
So basically I have this tested on my lab only I proceed into production. Whenever you aren’t confident about the solutions please always run your lab. Don’t give people heart attack. Active Directory is a sensitive being.
My situation is that we have existing Windows Server 2008 R2 and is moving to Windows Server 2019, currently there is a root certificate authority siting in Windows Server 2008 R2 and would like to transition to Windows Server 2019 without downtime. Hence, Migrating is not the right word for this situation, because Migration required downtime. Imagine people working from home unable to VPN access into the work environment. You will get the scream and shout by them, Good Luck.
For having a multiple root CA, so that at the network layer/firewall layer, the network administrator can create another certificate access for user to VPN access using either the old Root CA or new Root CA. Hence, zero downtime.
Step by Step:
- You have to add the roles and feature into your Windows Server 2019
-
- Once you have the role installed and the configuration setup (just follow the default configuration, please choose Enterprise Root CA)
- Make sure your instance naming or certificate authority name is not duplicated with your other certificate authority server name
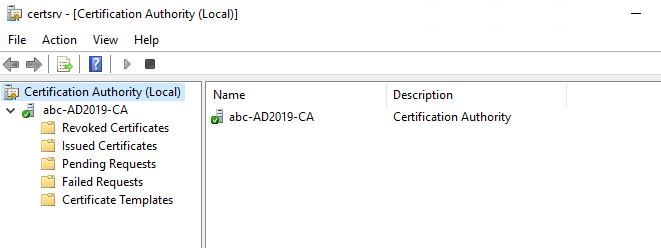
- This is the result of successful setup of the certificate authority
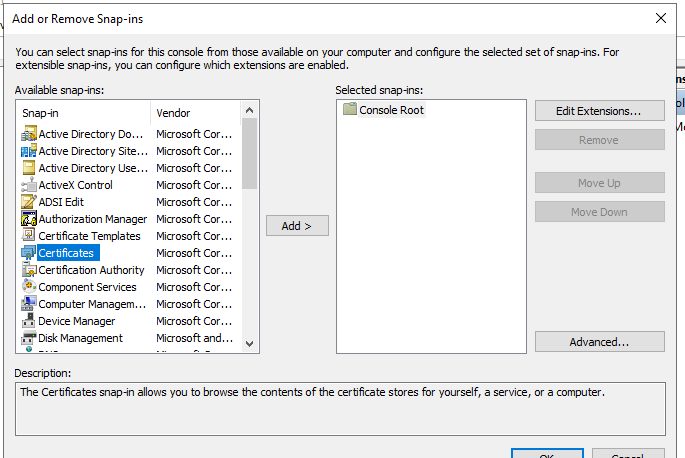
- So now you got to make sure the certificate authority server has its certificate propagate on its local machine too
- Launch Start > Run > mmc
- MMC > File > Add/Remove Snap-in… > Certificates
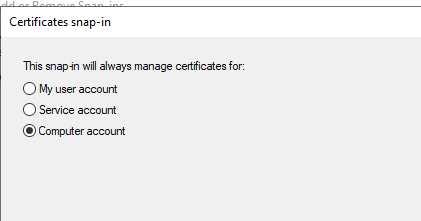
- Certificates > Computer account > Local computer > Finish
- Certificates (Local Computer) > Expand the folder > Personal > Certificates
- Certificates (Local Computer) > Expand the folder > Trusted Root Certification Authorities > Certificates
- Because now the forest has 2 Root CA, so your trusted root CA folder would have 2 Root CA certificate
- To export the new root CA certificate to your network administrator, Launch your command prompt on the Root CA server > run the following command
- certutil -ca.cert <filename>.cer
- To allow the other server members of the forest, please access to the server and follow step 6 to step 9, remove the old Root CA
- Then run a gpupdate /force command line > Reboot the server, to have the changes reflected
- Perform a checking whether the changes has reflected to the other server(s) after performing step 13 to 14, please access to their local computer certificate and check. Repeat step 6 to step 10.


*Note:
- Do not export the Root CA certificate and import to the servers, because this would beat the purpose Enterprise Root Certificate Authority
- If you have a larger environment it would take awhile for the change to replicate. Hence, continue the gpupdate /force until you receive the result you wanted on the server

This isn’t recommended by anyone (including Microsoft), because it isn’t the appropriate solution for enterprise CA services. You should have ONE Enterprise Root CA, which is mainly kept offline, and then one or more subordinate (issuing) CAs.
This way, if you have a VPN solution that requires short-duration smartcard certs or similar, you can maintain/upgrade one of the subordinate CAs while the other remains online.
LikeLike