Troubleshoot Virtual machines status off-critical problem in Hyper-V

In this case, it was my lab environment, I have an external SSD which is purely just for my lab. I faced this problem is because my laptop reads the external SSD and apply that drive with a different disk letter.

So at first all my virtual Hard Disk are located in disk letter E, this is their original location.

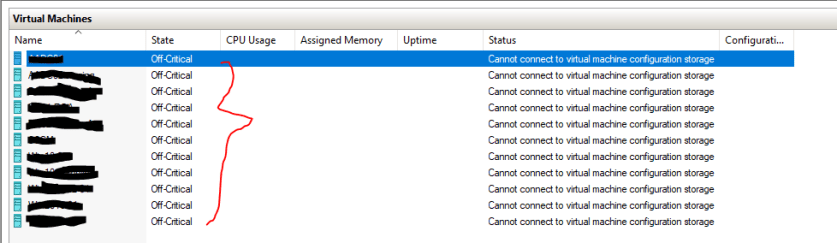
I have multiple USB and external drives so the laptop tends to have a cache of previous used drive. I recently created a bootable USB for another product and when I try to plug in my lab’s external drive, my laptop apply the driver letter as G, I didn’t notice it until I launch my Hyper-V console, the status of my virtual machines are still showing “Off-critical” for quite a long period, refresh also didn’t work. Thus, this causes unable to boot up my virtual machines.

Capture

After some thoughts, I connect one of the virtual machine and see the location/directory of my virtual hard disk and it is pointing to the driver letter E, next I go ahead and launch the file explorer and there my external drive is no longer listed as letter E instead of the letter G.

To resolve this, I launch the “Disk management” console, and change the letter of my external drive from G to E. Head back to my Hyper-V console, my virtual machines are able to boot up and the status “Off-critical” is no longer showing.

Note:

  • Do take note that it requires a requires a reboot of your laptop if you were trying to mimic/simulate this issue.

Capture

There are other reasons that you could face this issue, it could be corrupted drive, or drive is disconnected.


Difference of Hyper-V in Legacy Server and Non-Legacy Server (Backup)

To those that wants to perform Live backup or export (to a local drive or external drive) of your virtual machines via Hyper-V, before you jump into that there are few things that you need to take concern of;

  1. Where is your virtual machines located on what server operating system?
  2. Does the server support live backup or export?

What is live backup or export?

  • A live backup or export is where you could run your backup without having to shut down the virtual machines. This require minimal to zero impact or downtime.


If your virtual machines are hosted on a legacy server, such as Windows Server 2012 below, you are require to shut down the virtual machines and perform the backup or export. If the virtual machine is not shut down the export button will not be shown to you to perform the backup. However, please do take note that if you were to migrate virtual machines from legacy server to non-legacy server, is best to not use the export feature in the legacy server, please refer the reference below for full explanation and proper way to migrate.


If your virtual machines are hosted on a non-legacy server, such as Windows server 2012 and above, then you can perform live backup or export without the need to experiences total downtime. As technology getting more advance this is the benefit to IT admins to perform their tasks without the need to perform after hours, and end users will not experience total downtime.


Do also read up and understand when to use checkpoints and when not to use checkpoints. Is basically means snapshots.


References:

  1. https://sabrinaksy.wordpress.com/2020/02/20/how-to-migrate-or-import-vm-from-windows-server-2008-r2-to-windows-server-2012-r2/
  2. https://www.petri.com/live-exporting-windows-server-2012-r2-hyper-v-vms
  3. https://blog.workinghardinit.work/2016/06/16/live-export-a-running-virtual-machine-or-a-checkpoint/


How to Migrate or Import VM from Windows Server 2008 R2 to Windows Server 2012 R2?

This is my first time doing VM migration or import/export of VM from server 2008 R2 to server 2012 R2. At first, I used the export function from the Hyper-V in server 2008 R2 and I notice the export result was different from the server 2012 R2. Thus, when I try to import the VM from server 2008 R2 to server 2012 R2, it was unable to recognize.

Always make a backup copy! Don’t modify the original!

This is because 2008 or 2008 R2 are legacy servers, and choosing the export feature to export the VM will result of export EXP file instead of XML file. In server 2012 R2, VM that is exported has XML file.

The best way to import VM from legacy server is to copy the entire VM folder to server 2012 R2. When I mean entire VM folder, means its VHD and etc..

This VM that I am importing does not have any checkpoints or snapshot, so I am unsure that do you required to delete the copied snapshots before you import.

So what I did was,

  1. At server 2008 R2, shut down the VM
  2. Locate the entire Data folder of the VM in File Explorer
  3. Right click the folder > Properties > Share > Advanced Sharing > Add the specific user account (server 2012 R2) and the computer (server 2012 R2) > Full Control
    • Is up to your choice on how you want your destination server to retrieve the source information (VM), it could be via a Network Share, a USB, or an external Hard Disk
  4. At server 2012 R2, open file explorer
  5. At the top bar, type “\\<2008 R2 server name/IP address>\<vm folder name>\”
  6. Copy the entire folder and paste it into server 2012 R2 (your comfortably location/driver/directory)
  7. Remember to remove the share permission of the folder in server 2008 R2, after you finish copying the folder  from server 2008 R2 to server 2012 R2
  8. Create a new folder in server 2012 R2 and rename it as your actual/original VM’s folder naming in server 2008 R2, this folder will be the new location of your VM
  9. Go to Hyper-V in server 2012 R2 > select the Import Virtual Machine at the right side bar
  10. Browse and locate the VM folder that you just copied
  11. Select the import type “Copy the virtual machine“, this allows you to create a new unique ID of the virtual machine and also allows you to choose your new location to store this VM in sever 2012 R2
    • Capture
  12. Make sure the new location are browse to the new folder that you just created in server 2012 R2
  13. Then you click next > finish and wait for the importing to complete
  14. Make sure the VM in server 2008 R2 is Shut down
  15. Start or Boot up the VM in server 2012 R2 (If required to change IP address of the VM then change)
  16. Everything is fine and monitor for 48 hours, then only decide to remove the VM in server 2008 R2


After import the VM, Hyper-V do not start the VM automatically. You have to start the VM manually, after import completed.