To be honest, I felt a bit fooled by the “masking” method. Well at first just by looking at the feature at file policy, I thought it has the capability to mask sensitive information on the files but I was wrong until I test it out myself.
Another honesty from me is that I had read 7 times on one of the paragraphs from Microsoft Docs, about masking, then only I notice this feature is just plain masking to prevent from viewing at administration side. #sadme #dummy
*Note:
- There are administration permission/role settings that you could manage. Will talk about this more on another blog
- This doesn’t limit to only Office 365 Products.
It was this paragraph;
In addition, you can specify a regular expression to exclude a file from the results. This option is highly useful if you have an inner classification keyword standard that you want to exclude from the policy.
You can decide set the minimum number of content violations that you want to match before the file is considered a violation. For example, you can choose 10 if you want to be alerted on files with at least 10 credit card numbers found within its content.
When content is matched against the selected expression, the violation text is replaced with “X” characters. By default, violations are masked and shown in their context displaying 100 characters before and after the violation. Numbers in the context of the expression are replaced with “#” characters and are never stored within Cloud App Security. You can select the option to Unmask the last four characters of a violation to unmask the last four characters of the violation itself. It’s necessary to set which data types the regular expression searches: content, metadata and/or file name. By default, it searches the content and the metadata.
So the policy is all the same stage;
- Define Condition
- Define Actions
- Define Exception
- Define Notification
Anyway, this blog will elaborate on how the masking works;
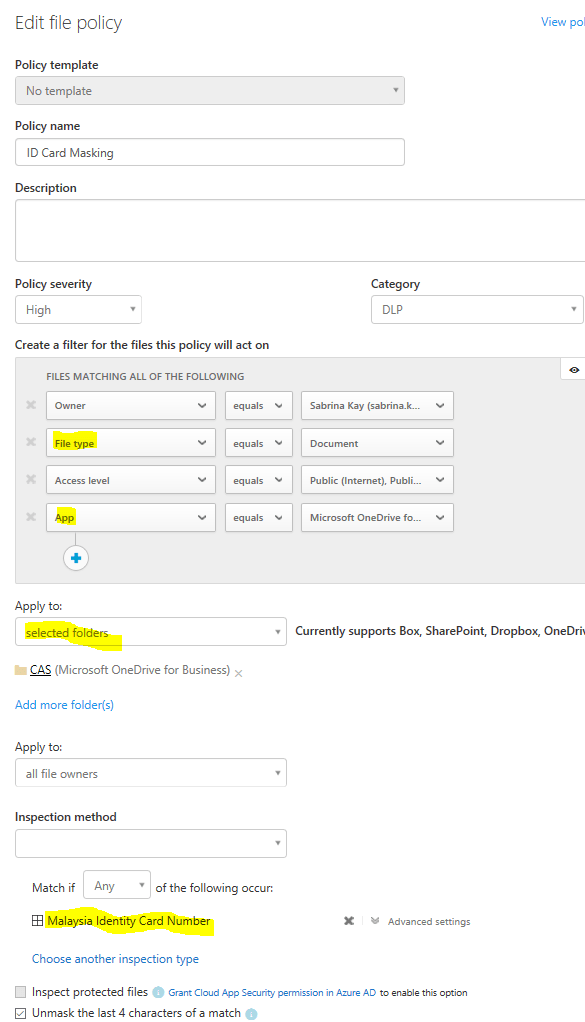
So I have created a file policy named “ID Card Masking”, so the purpose of this policy is to identify documents that contain “Malaysian Identification Card” and enable masking to prevent administrator to have the privilege to view full details and prevent having it to store in Cloud App Security.
- Go to Control > Policies
2. Expand ID Card Masking policy settings
- I selected no template
- Give a policy name
- Give a level of severity
- Give a Category type
- Give some Filtering that this policy will act on (The clearer the better the match)
- I selected a specific folder in my OneDrive for Business for this policy to act on
- Next, I selected the Inspection method > Data Classification Service > Malaysian Identification Card
- This part you can only choose 1 Data Classification for each file policy you created
- I checked Unmask last 4 sensitive information
3. Next, you will have to define notification and actions
- So for notification, I leave it as default
- For action, you have the option to apply AIP on this document that matches to this policy

*The AIP label contain DLP labelling and AIP labelling for you to choose from
4. So after 3 minutes of this policy creation, you will be able to view matching result from Investigation tab or Policy.
- Click on the Policy name (highligted)

- Then it will show you the statement where the sensitive information found in the documents
- And these sensitive informatino are masked and last 4 value are unmask

So yeah…that is how the masking works and looks like. If you would like more about what and how, do drop me an email or comment below 😀
References:
- https://docs.microsoft.com/en-us/cloud-app-security/data-protection-policies


